Flutter - 动画Animation开发指南

精心设计的动画会让用户界面感觉更直观、流畅,能改善用户体验。 Flutter的动画支持可以轻松实现各种动画类型。许多widget,特别是Material Design widgets, 都带有在其设计规范中定义的标准动画效果,但也可以自定义这些效果。

动画Animation开发指南

  • 在Flutter中有哪些类型的动画?
  • 如何使用动画库中的基础类给widget添加动画?
  • 如何为动画添加监听器?
  • 该什么时候使用AnimatedWidget与AnimatedBuilder?
  • 如何使用Hero动画?

在Flutter中有哪些类型的动画?

在Flutter中动画分为两类:基于tween或基于物理的。

  • 补间(Tween)动画:在补间动画中,定义了开始点和结束点、时间线以及定义转换时间和速度的曲线。然后由框架计算如何从开始点过渡到结束点。
  • 基于物理的动画:在基于物理的动画中,运动被模拟为与真实世界的行为相似。例如,当你掷球时,它在何处落地,取决于抛球速度有多快、球有多重、距离地面有多远。 类似地,将连接在弹簧上的球落下(并弹起)与连接到绳子上的球放下的方式也是不同。

如何使用动画库中的基础类给widget添加动画?

在为widget添加动画之前,先让我们认识下动画的几个朋友:

  • Animation:是Flutter动画库中的一个核心类,它生成指导动画的值;
  • CurvedAnimation:Animation的一个子类,将过程抽象为一个非线性曲线;
  • AnimationController:Animation的一个子类,用来管理Animation;
  • Tween:在正在执行动画的对象所使用的数据范围之间生成值。例如,Tween可生成从红到蓝之间的色值,或者从0到255;

Animation

在Flutter中,Animation对象本身和UI渲染没有任何关系。Animation是一个抽象类,它拥有其当前值和状态(完成或停止)。其中一个比较常用的Animation类是Animation<double>
Flutter中的Animation对象是一个在一段时间内依次生成一个区间之间值的类。Animation对象的输出可以是线性的、曲线的、一个步进函数或者任何其他可以设计的映射。 根据Animation对象的控制方式,动画可以反向运行,甚至可以在中间切换方向。

  • Animation还可以生成除double之外的其他类型值,如:Animation<Color>Animation<Size>
  • Animation对象有状态。可以通过访问其value属性获取动画的当前值;
  • Animation对象本身和UI渲染没有任何关系;

CurvedAnimation

CurvedAnimation将动画过程定义为一个非线性曲线。

1
2
final CurvedAnimation curve =
new CurvedAnimation(parent: controller, curve: Curves.easeIn);

注: Curves 类定义了许多常用的曲线,也可以创建自己的,例如:

1
2
3
4
5
6
class ShakeCurve extends Curve {
@override
double transform(double t) {
return math.sin(t * math.PI * 2);
}
}

AnimationController

AnimationController是一个特殊的Animation对象,在屏幕刷新的每一帧,就会生成一个新的值。默认情况下,AnimationController在给定的时间段内会线性的生成从0.0到1.0的数字。 例如,下面代码创建一个Animation对象:

1
2
final AnimationController controller = new AnimationController(
duration: const Duration(milliseconds: 2000), vsync: this);

AnimationController派生自Animation<double>,因此可以在需要Animation对象的任何地方使用。 但是,AnimationController具有控制动画的其他方法:

  • forward():启动动画;
  • reverse({double from}):倒放动画;
  • reset():重置动画,将其设置到动画的开始位置;
  • stop({ bool canceled = true }):停止动画;

当创建一个AnimationController时,需要传递一个vsync参数,存在vsync时会防止屏幕外动画消耗不必要的资源,可以将stateful对象作为vsync的值。

注意: 在某些情况下,值(position,值动画的当前值)可能会超出AnimationController的0.0-1.0的范围。例如,fling()函数允许您提供速度(velocity)、力量(force)、position(通过Force对象)。位置(position)可以是任何东西,因此可以在0.0到1.0范围之外。 CurvedAnimation生成的值也可以超出0.0到1.0的范围。根据选择的曲线,CurvedAnimation的输出可以具有比输入更大的范围。例如,Curves.elasticIn等弹性曲线会生成大于或小于默认范围的值。

Tween

默认情况下,AnimationController对象的范围从0.0到1.0。如果您需要不同的范围或不同的数据类型,则可以使用Tween来配置动画以生成不同的范围或数据类型的值。例如,以下示例,Tween生成从-200.0到0.0的值:

1
final Tween doubleTween = new Tween<double>(begin: -200.0, end: 0.0);

Tween是一个无状态(stateless)对象,需要begin和end值。Tween的唯一职责就是定义从输入范围到输出范围的映射。输入范围通常为0.0到1.0,但这不是必须的。
Tween继承自Animatable<T>,而不是继承自Animation<T>。Animatable与Animation相似,不是必须输出double值。例如,ColorTween指定两种颜色之间的过渡。

1
2
final Tween colorTween =
new ColorTween(begin: Colors.transparent, end: Colors.black54);

Tween对象不存储任何状态。相反,它提供了evaluate(Animation<double> animation)方法将映射函数应用于动画当前值。 Animation对象的当前值可以通过value()方法取到。evaluate函数还执行一些其它处理,例如分别确保在动画值为0.0和1.0时返回开始和结束状态。

Tween.animate
要使用Tween对象,可调用它的animate()方法,传入一个控制器对象。例如,以下代码在500毫秒内生成从0到255的整数值。

1
2
3
final AnimationController controller = new AnimationController(
duration: const Duration(milliseconds: 500), vsync: this);
Animation<int> alpha = new IntTween(begin: 0, end: 255).animate(controller);

注意animate()返回的是一个Animation,而不是一个Animatable。
以下示例构建了一个控制器、一条曲线和一个Tween:

1
2
3
4
5
final AnimationController controller = new AnimationController(
duration: const Duration(milliseconds: 500), vsync: this);
final Animation curve =
new CurvedAnimation(parent: controller, curve: Curves.easeOut);
Animation<int> alpha = new IntTween(begin: 0, end: 255).animate(curve);

为widget添加动画

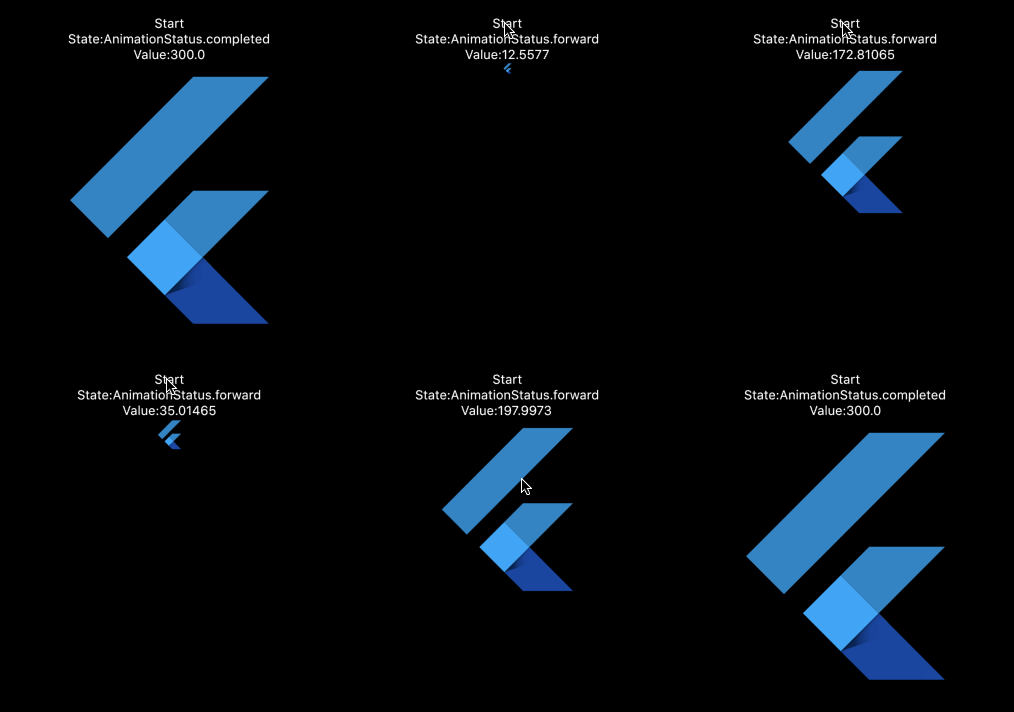
在下面的实例中我们为一个logo添加了一个从小放大的动画:
1
2
3
4
5
6
7
8
9
10
11
12
13
14
15
16
17
18
19
20
21
22
23
24
25
26
27
28
29
30
31
32
33
34
35
36
37
38
39
40
41
42
43
44
45
46
47
48
49
50
51
52
53
54
55
56
57
58
59
60
61
62
63
64
65
66
67
68
69
   import 'package:flutter/material.dart';

void main() => runApp(LogoApp());

class LogoApp extends StatefulWidget {
_LogoAppState createState() => _LogoAppState();
}

class _LogoAppState extends State<LogoApp> with SingleTickerProviderStateMixin {
Animation<double> animation;
AnimationController controller;
AnimationStatus animationState;
double animationValue;

@override
void initState() {
super.initState();
controller =
AnimationController(duration: const Duration(seconds: 2), vsync: this);
// #docregion addListener
animation = Tween<double>(begin: 0, end: 300).animate(controller)
..addListener(() {
// #enddocregion addListener
setState(() {
animationValue = animation.value;
});
// #docregion addListener
})
..addStatusListener((AnimationStatus state) {
setState(() {
animationState = state;
});
});
// #enddocregion addListener
}

@override
Widget build(BuildContext context) {
return Container(
margin: EdgeInsets.only(top: 50),
child: Column(
children: <Widget>[
GestureDetector(
onTap: () {
controller.reset();
controller.forward();
},
child: Text('Start', textDirection: TextDirection.ltr),
),
Text('State:' + animationState.toString(),
textDirection: TextDirection.ltr),
Text('Value:' + animationValue.toString(),
textDirection: TextDirection.ltr),
Container(
height: animation.value,
width: animation.value,
child: FlutterLogo(),
),
],
),
);
}

@override
void dispose() {
controller.dispose();
super.dispose();
}
}

注意,在上述代码中要实现这个动画的关键一步是在addListener()的回调中添加setState的调用这样才能触发页面重新渲染,动画才能有效,另外也可以通过AnimatedWidget来实现,在下文中会讲到。

如何为动画添加监听器?

有时我们需要知道动画执行的进度和状态,在Flutter中我们可以通过Animation的addListeneraddStatusListener方法为动画添加监听器:

  • addListener:动画的值发生变化时被调用;
  • addStatusListener:动画状态发生变化时被调用;
1
2
3
4
5
6
7
8
9
10
11
12
13
14
15
16
17
18
19
20
21
22
23
24
25
@override
void initState() {
super.initState();
controller =
AnimationController(duration: const Duration(seconds: 2), vsync: this);
animation = Tween<double>(begin: 0, end: 300).animate(controller)
// #enddocregion print-state
..addStatusListener((status) {
if (status == AnimationStatus.completed) {
controller.reverse();
} else if (status == AnimationStatus.dismissed) {
controller.forward();
}
})
// #docregion print-state
..addStatusListener((state) => print('$state'));
..addListener(() {
// #enddocregion addListener
setState(() {
// The state that has changed here is the animation object’s value.
});
// #docregion addListener
});
controller.forward();
}

可对照学习为widget添加动画的例子;

用AnimatedWidget与AnimatedBuilder简化和重构我们对动画的使用

什么是AnimatedWidget?

我们可以将AnimatedWidget理解为Animation的助手,使用它可以简化我们对动画的使用,在为widget添加动画的学习中我们不难发现,在不使用AnimatedWidget的情况下需要手动调用动画的addListener()并在回调中添加setState才能看到动画效果,AnimatedWidget将为我们简化这一操作。
在下面的重构示例中,LogoApp现在继承自AnimatedWidget而不是StatefulWidget。AnimatedWidget在绘制时使用动画的当前值。LogoApp仍然管理着AnimationController和Tween。

1
2
3
4
5
6
7
8
9
10
11
12
13
14
15
16
17
18
19
20
21
22
23
24
25
26
27
28
29
30
31
32
33
34
35
36
37
38
39
40
41
42
43
44
45
46
47
48
49
50
51
52

// Demonstrate a simple animation with AnimatedWidget

import 'package:flutter/animation.dart';
import 'package:flutter/material.dart';

class AnimatedLogo extends AnimatedWidget {
AnimatedLogo({Key key, Animation<double> animation})
: super(key: key, listenable: animation);

Widget build(BuildContext context) {
final Animation<double> animation = listenable;
return new Center(
child: new Container(
margin: new EdgeInsets.symmetric(vertical: 10.0),
height: animation.value,
width: animation.value,
child: new FlutterLogo(),
),
);
}
}

class LogoApp extends StatefulWidget {
_LogoAppState createState() => new _LogoAppState();
}

class _LogoAppState extends State<LogoApp> with SingleTickerProviderStateMixin {
AnimationController controller;
Animation<double> animation;

initState() {
super.initState();
controller = new AnimationController(
duration: const Duration(milliseconds: 2000), vsync: this);
animation = new Tween(begin: 0.0, end: 300.0).animate(controller);
controller.forward();
}

Widget build(BuildContext context) {
return new AnimatedLogo(animation: animation);
}

dispose() {
controller.dispose();
super.dispose();
}
}

void main() {
runApp(new LogoApp());
}

什么是AnimatedBuilder?
AnimatedBuilder是用于构建动画的通用widget,AnimatedBuilder对于希望将动画作为更大构建函数的一部分包含在内的更复杂的widget时非常有用,其实你可以这样理解:AnimatedBuilder是拆分动画的一个工具类,借助它我们可以将动画和widget进行分离:
在上面的实例中我们的代码存在的一个问题: 更改动画需要更改显示logo的widget。更好的解决方案是将职责分离:

  • 显示logo
  • 定义Animation对象
  • 渲染过渡效果

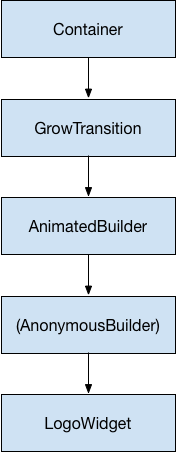
接下来我们就借助AnimatedBuilder类来完成此分离。AnimatedBuilder是渲染树中的一个独立的类, 与AnimatedWidget类似,AnimatedBuilder自动监听来自Animation对象的通知,不需要手动调用addListener()
我们根据下图的 widget 树来创建我们的代码:

1
2
3
4
5
6
7
8
9
10
11
12
13
14
15
16
17
18
19
20
21
22
23
24
25
26
27
28
29
30
31
32
33
34
35
36
37
38
39
40
41
42
43
44
45
46
47
48
49
50
51
52
53
54
55
56
57
58
59
60
61
62
63
64
65
66
67
import 'package:flutter/animation.dart';
import 'package:flutter/material.dart';

void main() => runApp(LogoApp());

// #docregion LogoWidget
class LogoWidget extends StatelessWidget {
// Leave out the height and width so it fills the animating parent
Widget build(BuildContext context) => Container(
margin: EdgeInsets.symmetric(vertical: 10),
child: FlutterLogo(),
);
}
// #enddocregion LogoWidget

// #docregion GrowTransition
class GrowTransition extends StatelessWidget {
GrowTransition({this.child, this.animation});

final Widget child;
final Animation<double> animation;

Widget build(BuildContext context) => Center(
child: AnimatedBuilder(
animation: animation,
builder: (context, child) => Container(
height: animation.value,
width: animation.value,
child: child,
),
child: child),
);
}
// #enddocregion GrowTransition

class LogoApp extends StatefulWidget {
_LogoAppState createState() => _LogoAppState();
}

// #docregion print-state
class _LogoAppState extends State<LogoApp> with SingleTickerProviderStateMixin {
Animation<double> animation;
AnimationController controller;

@override
void initState() {
super.initState();
controller =
AnimationController(duration: const Duration(seconds: 2), vsync: this);
animation = Tween<double>(begin: 0, end: 300).animate(controller);
controller.forward();
}
// #enddocregion print-state

@override
Widget build(BuildContext context) => GrowTransition(
child: LogoWidget(),
animation: animation,
);

@override
void dispose() {
controller.dispose();
super.dispose();
}
// #docregion print-state
}

如何使用Hero动画?
什么是Hero动画?

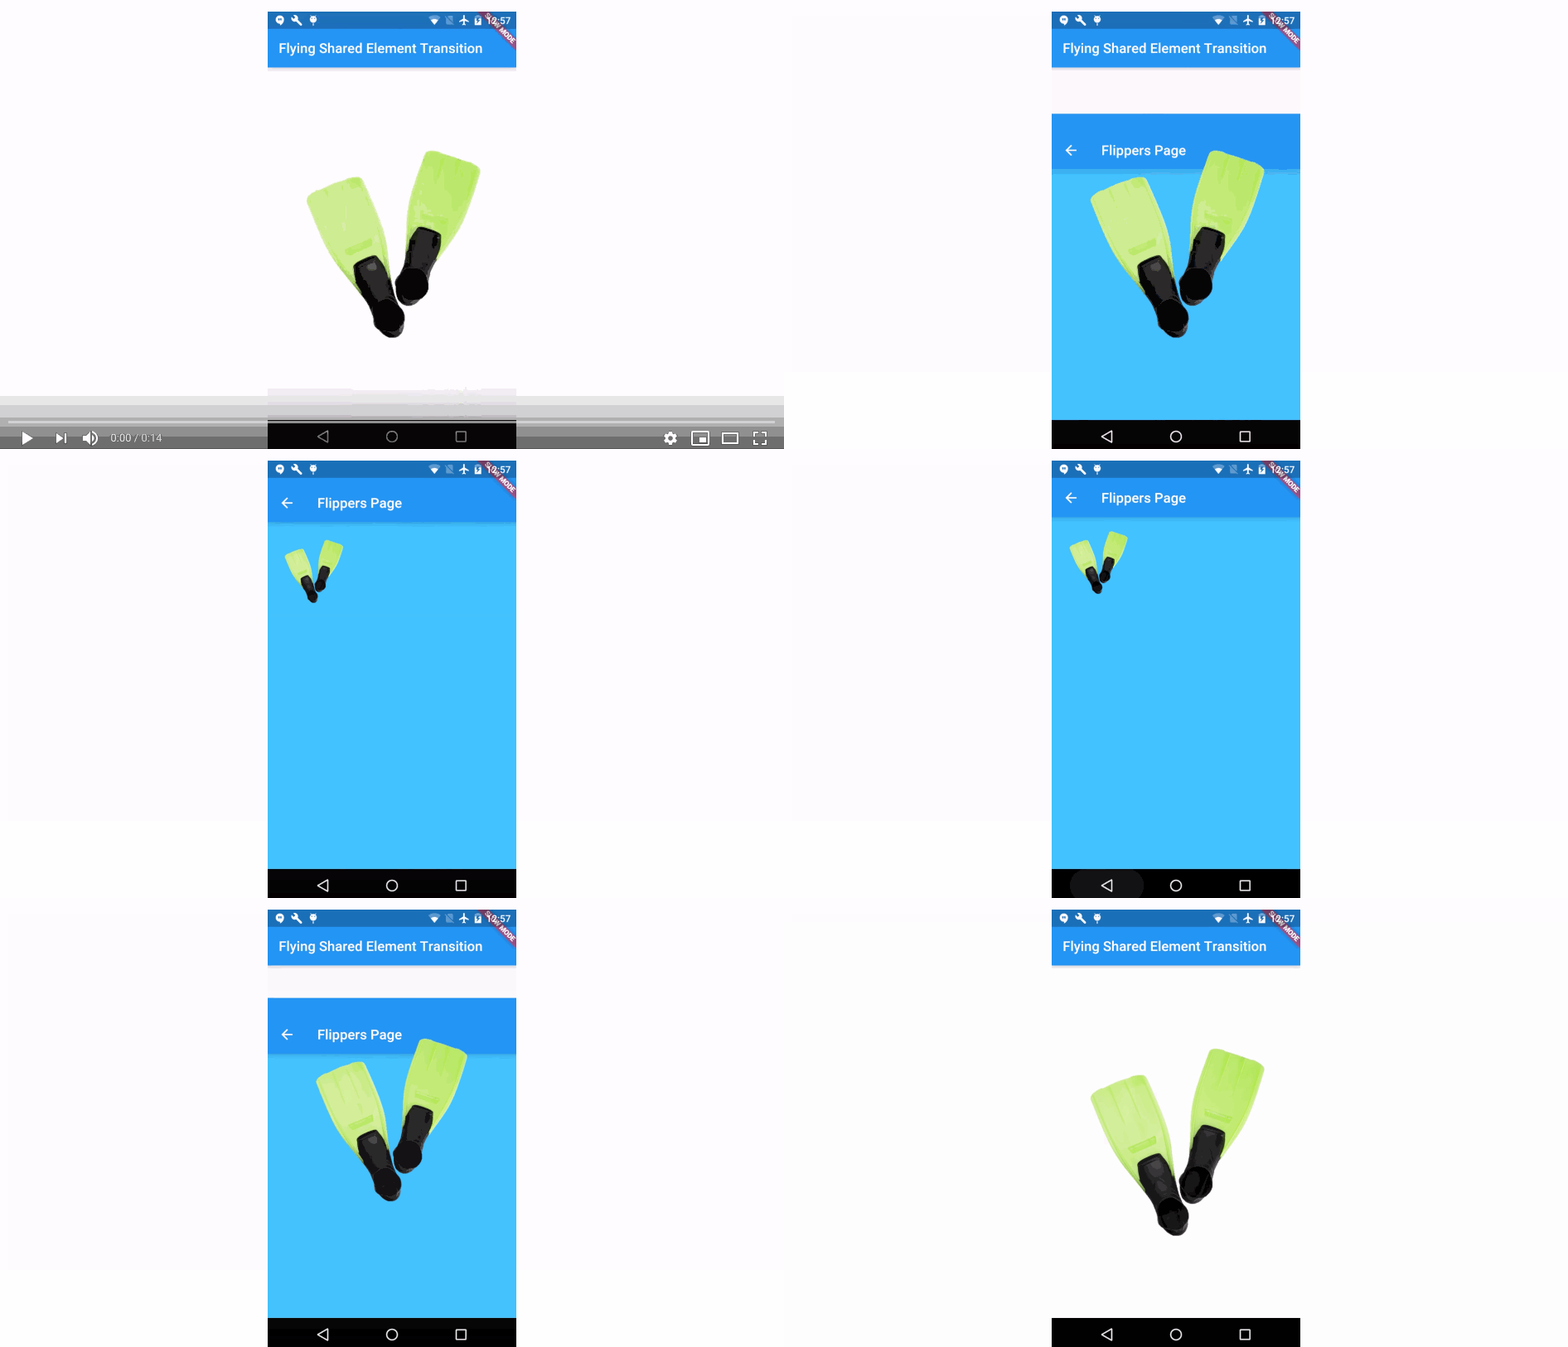
在 Flutter中可以用 Hero widget创建这个动画。当 hero 通过动画从源页面飞到目标页面时,目标页面逐渐淡入视野。通常, hero 是用户界面的一小部分,如图片,它通常在两个页面都有。从用户的角度来看, hero 在页面之间“飞翔”。接下来我们一起来学习如何创建Hero动画:
实现标准hero动画

1
2
3
4
5
6
7
8
9
10
11
12
13
14
15
16
17
18
19
20
21
22
23
24
25
26
27
28
29
30
31
32
33
34
35
36
37
38
39
40
41
42
43
44
45
46
47
48
49
50
51
52
53
54
55
56
57
58
59
60
61
62
63
64
65
66
67
68
69
70
71
72
73
74
75
import 'package:flutter/material.dart';
import 'package:flutter/scheduler.dart' show timeDilation;

class PhotoHero extends StatelessWidget {
const PhotoHero({ Key key, this.photo, this.onTap, this.width }) : super(key: key);

final String photo;
final VoidCallback onTap;
final double width;

Widget build(BuildContext context) {
return SizedBox(
width: width,
child: Hero(
tag: photo,
child: Material(
color: Colors.transparent,
child: InkWell(
onTap: onTap,
child: Image.network(
photo,
fit: BoxFit.contain,
),
),
),
),
);
}
}

class HeroAnimation extends StatelessWidget {
Widget build(BuildContext context) {
timeDilation = 10.0; // 1.0 means normal animation speed.

return Scaffold(
appBar: AppBar(
title: const Text('Basic Hero Animation'),
),
body: Center(
child: PhotoHero(
photo: 'https://raw.githubusercontent.com/flutter/website/master/examples/_animation/hero_animation/images/flippers-alpha.png',
width: 300.0,
onTap: () {
Navigator.of(context).push(MaterialPageRoute<void>(
builder: (BuildContext context) {
return Scaffold(
appBar: AppBar(
title: const Text('Flippers Page'),
),
body: Container(
// Set background to blue to emphasize that it's a new route.
color: Colors.lightBlueAccent,
padding: const EdgeInsets.all(16.0),
alignment: Alignment.topLeft,
child: PhotoHero(
photo: 'https://raw.githubusercontent.com/flutter/website/master/examples/_animation/hero_animation/images/flippers-alpha.png',
width: 100.0,
onTap: () {
Navigator.of(context).pop();
},
),
),
);
}
));
},
),
),
);
}
}

void main() {
runApp(MaterialApp(home: HeroAnimation()));
}

Hero的函数原型

1
2
3
4
5
6
7
8
9
10
11
12
const Hero({
Key key,
@required this.tag,
this.createRectTween,
this.flightShuttleBuilder,
this.placeholderBuilder,
this.transitionOnUserGestures = false,
@required this.child,
}) : assert(tag != null),
assert(transitionOnUserGestures != null),
assert(child != null),
super(key: key);
  • tag:[必须]用于关联两个Hero动画的标识;
  • createRectTween:[可选]定义目标Hero的边界,在从起始位置到目的位置的“飞行”过程中该如何变化;
  • child:[必须]定义动画所呈现的widget;

实现径向hero动画

1
2
3
4
5
6
7
8
9
10
11
12
13
14
15
16
17
18
19
20
21
22
23
24
25
26
27
28
29
30
31
32
33
34
35
36
37
38
39
40
41
42
43
44
45
46
47
48
49
50
51
52
53
54
55
56
57
58
59
60
61
62
63
64
65
66
67
68
69
70
71
72
73
74
75
76
77
78
79
80
81
82
83
84
85
86
87
88
89
90
91
92
93
94
95
96
97
98
99
100
101
102
103
104
105
106
107
108
109
110
111
112
113
114
115
116
117
118
119
120
121
122
123
124
125
126
127
128
129
130
131
132
133
134
135
136
137
138
139
140
141
142
143
144
145
146
147
148
149
150
151
152
153
154
155
156
157
158
159
160
161
162
163
164
165
166
167
168
import 'dart:math' as math;

import 'package:flutter/material.dart';
import 'package:flutter/scheduler.dart' show timeDilation;

class Photo extends StatelessWidget {
Photo({ Key key, this.photo, this.color, this.onTap }) : super(key: key);

final String photo;
final Color color;
final VoidCallback onTap;

Widget build(BuildContext context) {
return Material(
// Slightly opaque color appears where the image has transparency.
color: Theme.of(context).primaryColor.withOpacity(0.25),
child: InkWell(
onTap: onTap,
child: LayoutBuilder(
builder: (BuildContext context, BoxConstraints size) {
return Image.network(
photo,
fit: BoxFit.contain,
);
},
),
),
);
}
}

class RadialExpansion extends StatelessWidget {
RadialExpansion({
Key key,
this.maxRadius,
this.child,
}) : clipRectSize = 2.0 * (maxRadius / math.sqrt2),
super(key: key);

final double maxRadius;
final clipRectSize;
final Widget child;

@override
Widget build(BuildContext context) {
return ClipOval(
child: Center(
child: SizedBox(
width: clipRectSize,
height: clipRectSize,
child: ClipRect(
child: child,
),
),
),
);
}
}

class RadialExpansionDemo extends StatelessWidget {
static const double kMinRadius = 32.0;
static const double kMaxRadius = 128.0;
static const opacityCurve = const Interval(0.0, 0.75, curve: Curves.fastOutSlowIn);

static RectTween _createRectTween(Rect begin, Rect end) {
return MaterialRectCenterArcTween(begin: begin, end: end);
}

static Widget _buildPage(BuildContext context, String imageName, String description) {
return Container(
color: Theme.of(context).canvasColor,
child: Center(
child: Card(
elevation: 8.0,
child: Column(
mainAxisSize: MainAxisSize.min,
children: [
SizedBox(
width: kMaxRadius * 2.0,
height: kMaxRadius * 2.0,
child: Hero(
createRectTween: _createRectTween,
tag: imageName,
child: RadialExpansion(
maxRadius: kMaxRadius,
child: Photo(
photo: imageName,
onTap: () {
Navigator.of(context).pop();
},
),
),
),
),
Text(
description,
style: TextStyle(fontWeight: FontWeight.bold),
textScaleFactor: 3.0,
),
const SizedBox(height: 16.0),
],
),
),
),
);
}

Widget _buildHero(BuildContext context, String imageName, String description) {
return Container(
width: kMinRadius * 2.0,
height: kMinRadius * 2.0,
child: Hero(
createRectTween: _createRectTween,
tag: imageName,
child: RadialExpansion(
maxRadius: kMaxRadius,
child: Photo(
photo: imageName,
onTap: () {
Navigator.of(context).push(
PageRouteBuilder<void>(
pageBuilder: (BuildContext context, Animation<double> animation, Animation<double> secondaryAnimation) {
return AnimatedBuilder(
animation: animation,
builder: (BuildContext context, Widget child) {
return Opacity(
opacity: opacityCurve.transform(animation.value),
child: _buildPage(context, imageName, description),
);
}
);
},
),
);
},
),
),
),
);
}

@override
Widget build(BuildContext context) {
timeDilation = 5.0; // 1.0 is normal animation speed.

return Scaffold(
appBar: AppBar(
title: const Text('Radial Transition Demo'),
),
body: Container(
padding: const EdgeInsets.all(32.0),
alignment: FractionalOffset.bottomLeft,
child: Row(
mainAxisAlignment: MainAxisAlignment.spaceBetween,
children: [
_buildHero(context, 'https://raw.githubusercontent.com/flutter/website/master/examples/_animation/radial_hero_animation/images/chair-alpha.png', 'Chair'),
_buildHero(context, 'https://raw.githubusercontent.com/flutter/website/master/examples/_animation/radial_hero_animation/images/binoculars-alpha.png', 'Binoculars'),
_buildHero(context, 'https://raw.githubusercontent.com/flutter/website/master/examples/_animation/radial_hero_animation/images/beachball-alpha.png', 'Beach ball'),
],
),
),
);
}
}

void main() {
runApp(MaterialApp(home: RadialExpansionDemo()));
}